Have you ever admired the intricate beauty of succulents and wished you could capture that charm on paper? In this article, we’ll guide you through how to draw a succulent in 5 easy steps, perfect for beginners who want to unleash their creativity without feeling overwhelmed. Whether you’re picking up a pencil for the first time or looking to refine your skills, these straightforward techniques will have you rendering gorgeous succulents in no time. Let’s dive in and transform your passion for plants into stunning artwork!
Are you ready to unleash your inner artist? If you’ve ever found yourself enchanted by the beauty of succulents but felt intimidated by the idea of drawing them, you’re in the right place! In this guide, Draw a Succulent in 5 Easy Steps: Perfect for Beginners, we’ll walk you through a simple and enjoyable process that will have you creating stunning plant illustrations in no time. With clear instructions and a dash of creativity, you’ll be amazed at what you can achieve. Let’s dive in and cultivate your drawing skills!
Are you ready to transform your admiration for succulents into a tangible piece of art? Drawing may seem daunting, especially when it comes to those prickly, plump, and delightful little plants, but it’s really just about breaking down the process into bite-sized steps. Think of each stage as a mini-mission in your artistic adventure—one that promises to be as enjoyable as a weekend brunch on a sunlit patio!
Choosing Your Tools
Before diving into the drawing process, it’s crucial to gather your materials. Here’s a simple list of what you’ll need:
- Pencils: A standard pencil for sketching and an eraser to correct those little hiccups.
- Paper: Smooth, bright white paper works best. If you have a sketchbook, that’s perfect too!
- Colored Pencils or Markers: For when you want to add the vibrant hues of succulents to your creation, think mint greens, dusty pinks, and soft blues.
- Reference Images: Photographs or real plants can inspire your illustrations and help you capture the nuances.
With the right tools in hand, you’re ready to embark on this botanical journey. Imagine each pencil stroke as planting your artistic seeds in rich soil—everything grows from here!
The Simple Steps to Draw Succulents
Now, let’s break down the process into five simple steps that even your cat could follow (if it had opposable thumbs). The best part? You don’t have to be a seasoned artist to create something beautiful.
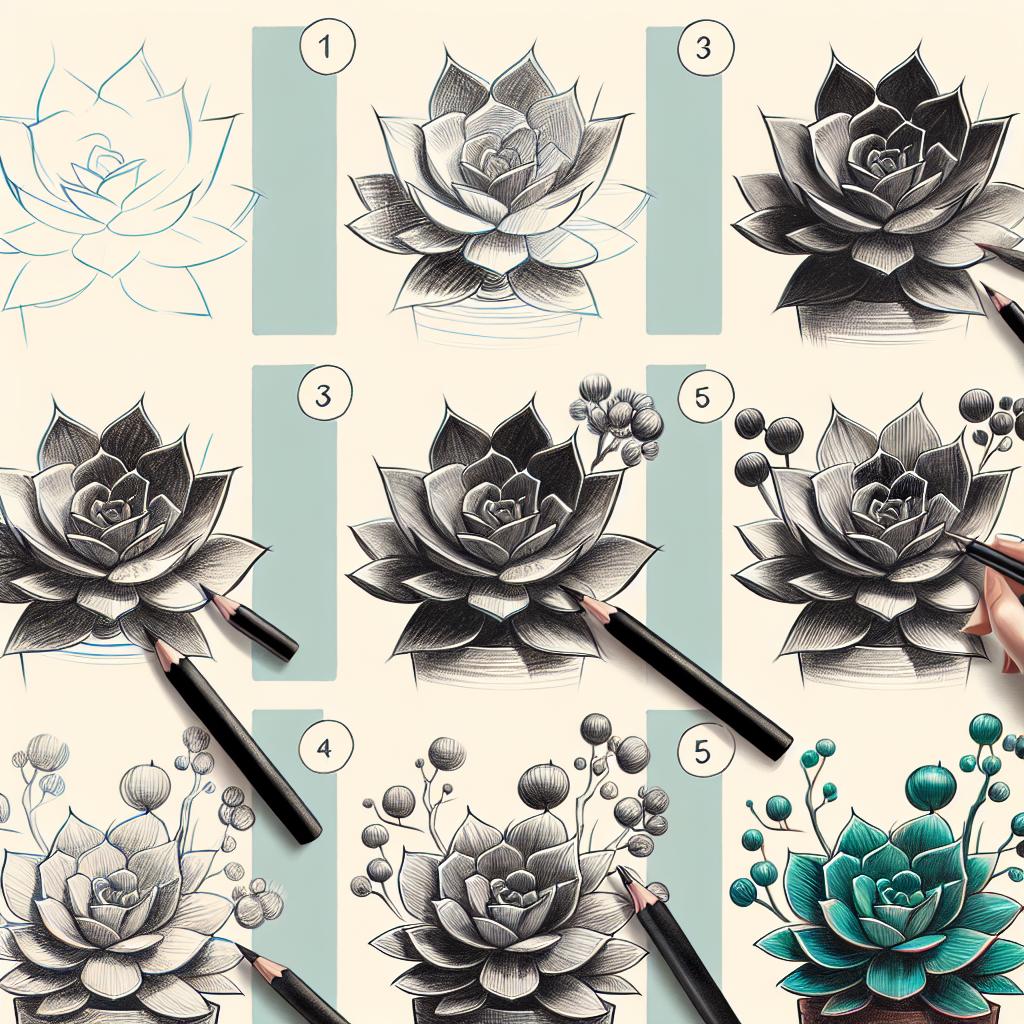
- Sketch the Outline: Start by lightly sketching an oval shape for the body of the plant. Add a few pointy leaf shapes extending from the body. Think of this as drawing a plump burrito with little leaf-nuggets around it.
- Add Details: Next, outline the leaves with gentle curves and make them look a bit thicker at the base. Remember, succulents are like the good friends who put on a bit of extra weight in the fall—round and joyful!
- Shade: Lightly shade the areas that are less exposed to light. Think of it as giving your plant a sun-kissed glow, making it look just as vibrant as those lush garden centers you visit on warm afternoons.
- Color Your Creation: If you’re feeling adventurous, grab your colored pencils. Start with the lighter colors and layer in darker shades. Picture your succulent as a character in a seaside sunset, vibrant yet soothing.
- Final Touches: Add some small details to make your succulent pop—think little speckles or lines that mimic the natural textures. This is where you can let your creativity bloom, and trust me, it’s usually the quirks that make your art stand out!
Pro Tips for Success
Just like tending to a real plant, your artistic journey requires patience and practice. Here are a few pro tips to enhance your drawing experience:
- Practice Different Species: Succulents come in mesmerizing varieties. Experiment with drawing a straightforward Echeveria or the intricate patterns of a Haworthia. Each type has its charm and challenges!
- Stay Relaxed: If you feel tense, take a step back, breathe, and perhaps enjoy a cup of tea. Your drawing sessions should feel like a chill day at a café, not a high-stress exam!
- Join a Community: Consider joining online forums or local art clubs where you can share your succulent illustrations. It’s a great way to receive feedback and find inspiration, and who knows, you might make a few friends along the way!
drawing succulents can offer more than just pretty pictures; it’s a therapeutic escape that fosters creativity. So let your pencil dance on that paper, and who knows? You might discover your inner artist blooming right before your eyes!
Frequently Asked Questions
What materials do I need to draw a succulent?
To start drawing a succulent, you’ll need some basic materials that are easy to acquire and budget-friendly. The essentials include:
- Drawing paper: Choose a suitable weight, ideally a medium to heavy weight paper that can handle erasing and multiple pencil strokes.
- Pencils: A range of pencils, from H (hard) to B (soft) grades, is recommended. H pencils are great for fine lines, while B pencils can be used for shading.
- Eraser: A standard rubber eraser for basic corrections and a kneaded eraser for more delicate erasing.
- Colored pencils or watercolors (optional): If you want to add color, opt for colored pencils for detailed shading or watercolors for a softer appearance.
Once you gather your materials, make sure you find a comfortable workspace with good lighting. This setup not only enhances your drawing experience but also allows you to see your work clearly, ensuring accuracy and detail.
How can beginners understand the shape of a succulent when drawing?
Understanding the shape of a succulent is crucial for beginners, as these plants typically have unique, geometric forms. Start by observing how succulents grow. Many have rosette shapes, which are formed by overlapping leaves that can look almost like a spiral. To simplify this process, consider breaking down the succulent into basic geometric shapes—this approach is effective and beginner-friendly.
Here’s how to begin:
- Identify the core structure: Many succulents can be visualized as circles, triangles, or ovals. For instance, the popular Echeveria has a prominent rosette shape that can be sketched using circular outlines.
- Use contour lines: Draw lightly to capture the outline and essence of the leaves. Focus on their curvature and orientation, as they often fan outwards from the center.
- Practice with reference images: Utilize photographs or real succulents to understand their growth patterns. This practice aids in replicating their appearance and can pave the way for enhancing your artistic skills.
By simplifying the shapes and using references, beginners can build their confidence in capturing the essence of succulents without feeling overwhelmed.
What are the steps involved in drawing a succulent?
Drawing a succulent can be broken down into five easy steps, making the process approachable for beginners:
- Outline the shape: Start with basic shapes to outline the overall structure of the succulent. Focus on creating a light sketch that captures the general form.
- Add details: Once the outline is established, begin adding finer details like the shapes of the leaves. Pay attention to how they overlap and their distinct edges.
- Create texture: Use different pencil techniques to add texture to the leaves. Shading can be achieved by varying the pressure on your pencil or using a blending tool for smoother transitions.
- Finalize the drawing: Go over your lines, adding emphasis to the more important contours while erasing any unnecessary sketch lines. This refinement is crucial for a clean appearance.
- Color your succulent (optional): If desired, use colored pencils or light watercolors to bring your drawing to life. Plan out how colors will blend while considering the natural variations in real succulents.
By following these steps methodically, beginners can create their own succulent drawings that will be both rewarding and enjoyable.
How can I improve my succulent drawing skills?
Improving your drawing skills requires practice and dedication. Here are several strategies that can facilitate your growth as a beginner artist:
- Regular practice: Set aside time each week to draw succulents. Consistency is vital for mastering shapes and details. You may want to maintain a sketchbook dedicated to practicing different sub-types of succulents.
- Analyze different styles: Investigate various drawing styles, from hyper-realistic to minimalist approaches. This exploration can help you determine which style resonates with you, making your practice more enjoyable.
- Receive feedback: Sharing your artwork through social media or art communities can elicit constructive criticism. Engaging with others not only exposes you to different techniques but also fosters encouragement and motivation among peers.
Moreover, consider taking online courses or workshops focusing on botanical illustration. These programs often provide expert insights into techniques and offer resources tailored to those looking to enhance their skills in plant drawing.
What common mistakes do beginners make when drawing succulents?
Beginners often face several pitfalls when drawing succulents, but recognizing these can help avoid them. Here are some common mistakes:
- Neglecting proportions: One of the key issues is misjudging the proportions of the succulent’s leaves relative to the core shape. It’s essential to step back and assess whether the sizes look balanced and realistic.
- Over-detailing too soon: Beginners can get caught up in detailing before the foundational structure is in place. Focusing on outlines before committing to intricate designs helps ensure that the overall composition remains intact.
- Ignoring light and shadow: Many newcomers forget to incorporate shading, which brings depth and dimension to their drawings. Understanding how light interacts with forms creates a more lifelike appearance.
Awareness of these mistakes allows budding artists to work intentionally towards improving their technique. Learning to take your time and being patient with yourself is also essential in the artistic journey.
Can I use digital tools to draw succulents?
Absolutely! Digital art presents a myriad of benefits for drawing succulents. Utilizing graphic tablets or software applications like Adobe Illustrator, Procreate, and others allows for experimentation with different styles and techniques.
Here are ways to leverage digital tools:
- Flexibility: Digital art permits unlimited potential to undo mistakes without the stress of erasing or ruining traditional paper. If a color or line doesn’t work, you can easily adjust or revert to a previous version.
- Variety of brushes and effects: Many digital applications come with diverse brushes that mimic traditional tools, granting you the chance to create unique textures and effects. For instance, you can apply a watercolor effect to mimic the soft colors of real succulents effortlessly.
For beginners, starting digitally can feel less daunting as it allows for immediate visual feedback, encouraging growth without the traditional limitations of physical media. Just be sure to invest time in learning the tools to harness their full potential.
Concluding Remarks
mastering the art of drawing a succulent is just a few strokes away—thanks to our guide, “Draw a Succulent in 5 Easy Steps: Perfect for Beginners.” Whether you’re an absolute novice or just looking to brush up on your artistic skills, these straightforward steps equip you with the knowledge to create stunning succulent sketches that could rival those in your favorite plant shop.
Remember, the beauty of drawing lies not only in the end result but also in the joy of practicing and watching your skills blossom over time. So pick up your pencil, embrace your creativity, and turn those blank pages into a botanical masterpiece.
And who knows? Before long, you might just become the go-to “plant artist” among your friends. Just be prepared for the inevitable wave of requests for “draw me like one of your succulents” selfies! Happy drawing!


